Physical Address
8206 Louisiana Blvd NE, Suite A N03815
Albuquerque, NM 87113
United States
Physical Address
8206 Louisiana Blvd NE, Suite A N03815
Albuquerque, NM 87113
United States

Stiffness isn't inevitable with age. That glued-in-place feeling when you first stand up doesn't have to be permanent. Most people confuse mobility with flexibility, but they're different—mobility is active range you can control yourself. I've watched mobility decline rob people of independence gradually. The research is clear: regular mobility exercises maintain and restore range even after years of stiffness. This guide reveals ten essential movements that address the joints most likely to stiffen and cause problems.
Stiffness isn’t inevitable with age. That feeling when you first stand up in the morning—like your joints are glued in place—doesn’t have to be your permanent reality.
Most people confuse mobility with flexibility, but they’re fundamentally different. Flexibility is passive range—how far someone else can push your limb. Mobility is active range—how far you can move and control that movement yourself. You can be flexible without being mobile, and that gap creates problems.
I’ve watched mobility decline rob people of independence gradually, then suddenly. First, they can’t quite squat down to pick something up. Then stairs become challenging. Eventually, getting dressed or reaching overhead feels difficult. This progression isn’t age—it’s accumulated immobility from years of limited movement patterns.
The research is clear: regular mobility exercises maintain and often restore range of motion even in people who’ve been stiff for years. Your joints adapt to the demands you place on them. Demand nothing, get nothing. Demand daily movement through full ranges, and your body responds.
This approach complements a broader joint health strategy discussed in our Complete Exercise Guide for Joint Health: What Actually Strengthens and Protects, where mobility and strength work together to preserve long-term function.
This guide breaks down ten essential mobility exercises that address the joints most likely to stiffen and cause problems. Not complex yoga poses requiring existing flexibility. Simple, strategic movements anyone can start doing immediately that restore and maintain the mobility needed for comfortable, pain-free daily life.
Before diving into specific mobility exercises, let’s establish what we’re actually trying to accomplish.
Mobility combines several elements: joint range of motion, muscle flexibility, neuromuscular control, and tissue quality. When any of these decline, movement becomes restricted and compensatory patterns emerge.
Limited ankle mobility forces your knees to track poorly during squats and stairs. Restricted hip mobility makes your lower back overwork during bending and lifting. Stiff shoulders prevent comfortable overhead reaching and create neck tension.
These compensations don’t just feel awkward—they create abnormal stress patterns that accelerate joint wear and cause pain in areas that weren’t originally problematic.
Why mobility exercises work:
Regular movement through full ranges signals your nervous system that these positions are safe and necessary. Your brain literally changes its assessment of what movements are acceptable and maintains neural pathways for controlling them.
Research shows that regular joint movement improves synovial fluid circulation and cartilage nutrition, supporting long-term joint health (source).
Connective tissue adapts to mechanical stress. Tendons, ligaments, and fascia lengthen and become more pliable with consistent gentle stretching. This isn’t permanent—stop stretching and tissues gradually shorten again.
Synovial fluid circulates better through full-range movements, improving joint lubrication and cartilage nutrition. Static positions allow fluid to thicken and settle; movement keeps it flowing.
Muscle length responds to sustained stretching. Chronically shortened muscles from limited movement gradually lengthen when consistently stretched, reducing the pulling forces that restrict joint movement.
The key word: consistent. Occasional aggressive stretching produces minimal lasting benefit. Gentle daily mobility exercises create progressive, sustainable improvements.
Mobility improves fastest when paired with supportive daily habits like sleep posture, sitting patterns, and stress management, which we break down in 12 Lifestyle Changes That Transform Joint Health.
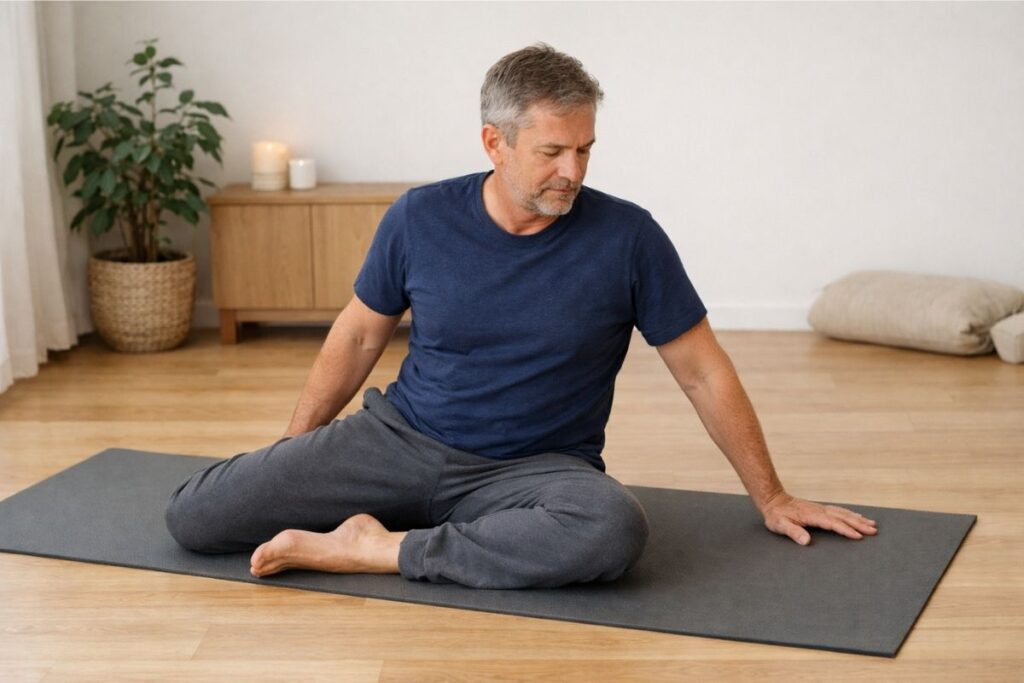
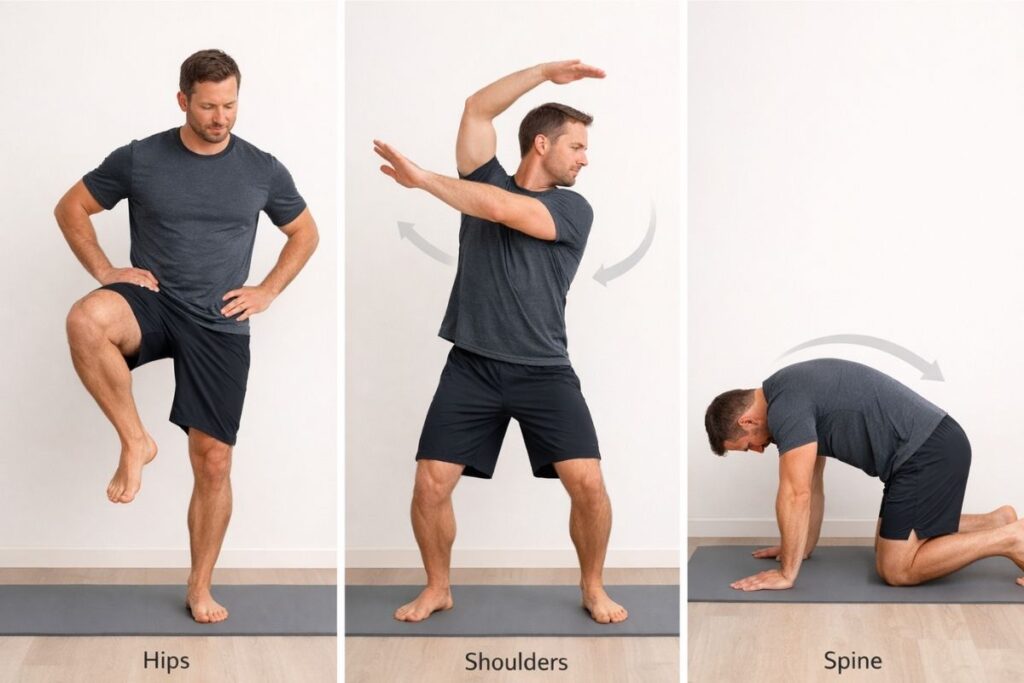
Hip mobility affects everything from squatting and walking to lower back health. The 90-90 position targets both internal and external rotation—movements that stiffen dramatically with age and sitting.
How to perform:
Sit on the floor with one leg bent 90 degrees in front of you (shin parallel to your body, knee pointing forward). Other leg bent 90 degrees to your side (shin perpendicular to your body, knee pointing to the side).
Keeping both knees bent, use your core and hips to rotate, switching leg positions so the front leg moves to the side and the side leg moves to the front. Move slowly and controlled—this isn’t about speed.
What you’ll feel:
Deep stretch in the hip of whichever leg is positioned to the side (external rotation stretch). Some people feel this intensely; others barely feel it. Both are fine—you’re working at your current range.
Your ability to get into the positions reveals your current hip mobility. Many people can’t even assume the starting position initially. That’s valuable information, not failure.
Progression:
Start by just getting into each position and holding 20-30 seconds rather than rotating between them. As this becomes easier, add the rotation movement.
Eventually, you can perform continuous rotations, moving smoothly from one position to the other. Ten rotations each direction daily maintains excellent hip mobility.
Why this matters for joint health:
Hip rotation stiffness forces compensatory movement in your lower back and knees. Maintaining rotational mobility prevents this compensation and the associated pain that develops.
For readers dealing with knee stiffness or pain, these mobility drills pair especially well with the strengthening movements outlined in 5 Essential Knee Exercises.
Your mid-back (thoracic spine) should rotate easily, but modern life—sitting, driving, computer work—locks it into limited positions. When your thoracic spine can’t rotate, your lower back and neck overwork to compensate.
How to perform:
Hands and knees position (quadruped). Place one hand behind your head. Rotate your torso, bringing your elbow toward the opposite hand on the ground. Then rotate the opposite direction, opening your chest and bringing your elbow toward the ceiling.
Move through the full range slowly and smoothly. The movement should come from your mid-back rotating, not your lower back twisting.
What you’ll feel:
Stretch across your upper back and chest as you rotate. Some people feel significant restriction; others move relatively freely. Your range reveals your current mobility.
The opening phase (elbow toward ceiling) is often more restricted than the closing phase. This asymmetry is common and indicates tight chest muscles and stiff mid-back.
Progression:
Start with 8-10 reps per side, focusing on controlled movement through whatever range you currently have. As mobility improves, range naturally increases.
You can add a pause at end ranges—hold the fully rotated position for 3-5 seconds before returning.
Why this matters:
Thoracic rotation is essential for activities from reaching across your body to turning to look behind you while driving. Limited range forces excessive neck and lower back rotation, creating pain in those areas.
Ankle mobility affects how you walk, squat, climb stairs, and balance. Stiff ankles change mechanics throughout your entire lower body, forcing compensations that stress knees and hips.
Ankle circles:
Seated with leg extended, trace large circles with your toes, moving from the ankle. Make circles as large as possible, moving through all directions—up, out, down, in.
Ten circles in each direction per ankle. This general mobility work prepares for more specific stretching.
Dorsiflexion stretch:
Stand facing a wall, one foot forward near the wall. Keeping your heel down, bend your front knee toward the wall. You should feel a stretch in your calf and Achilles.
The closer your foot to the wall, the more intense the stretch. Find a distance where you feel moderate stretch without pain.
Hold 30-60 seconds per side, 2-3 times.
What you’ll feel:
Ankle circles reveal restrictions—certain directions feel tight or limited. That’s normal and improves with practice.
The dorsiflexion stretch targets the calf and Achilles, which commonly limit ankle mobility. You should feel stretch in the lower calf and possibly the back of the ankle.
Progression:
For ankle circles, focus on making circles progressively larger as mobility improves.
For dorsiflexion, gradually move your foot closer to the wall over weeks, increasing the stretch. Don’t force it—progressive gentle stretching works better than aggressive pushing.
Why this matters:
Adequate dorsiflexion (bringing toes toward shin) is essential for normal squatting, stair climbing, and walking patterns. Limited dorsiflexion forces your knees forward excessively or makes you compensate with poor mechanics.
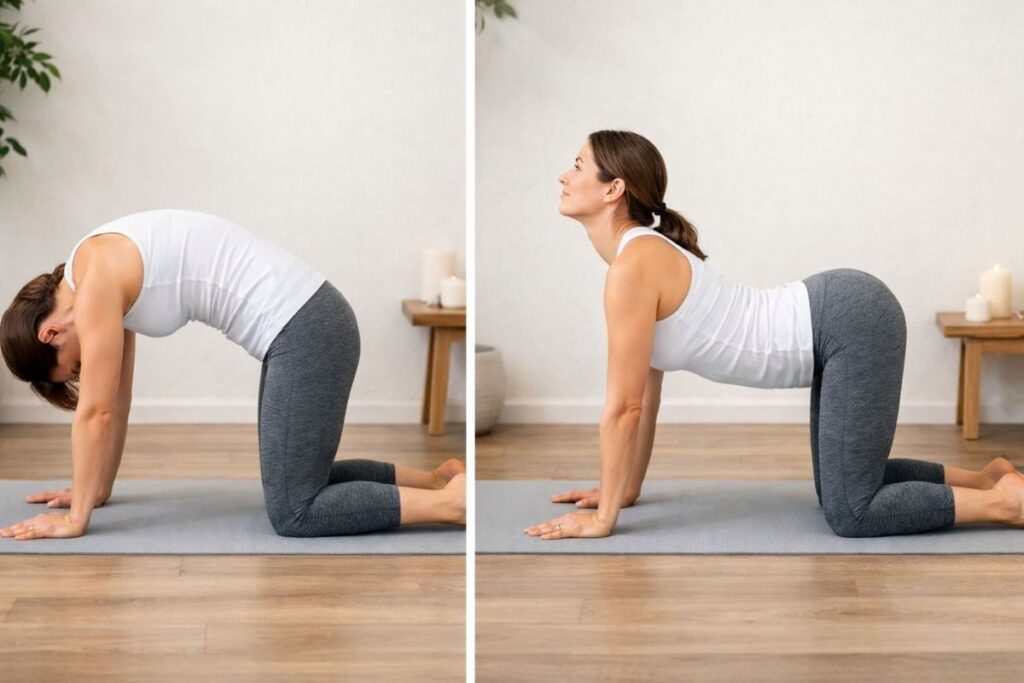
This classic mobility exercise moves your entire spine through flexion and extension, maintaining the movement capacity that daily life often doesn’t challenge.
How to perform:
Hands and knees position, hands under shoulders, knees under hips. Start in neutral spine—relatively flat back.
Cow position: Arch your back, lifting your chest and tailbone toward the ceiling. Your belly drops toward the floor. Lift your head and look slightly upward.
Cat position: Round your back, tucking your tailbone under and bringing your chin toward your chest. Create a big curve like a scared cat.
Move slowly between positions, taking 3-5 seconds for each transition. This isn’t a quick rocking motion—it’s a controlled wave through your spine.
What you’ll feel:
Stretch along your spine as you move between positions. Some areas might feel stiffer than others—that’s common and reveals where you hold tension or have limited mobility.
You might hear or feel clicking or popping, especially when first starting. Unless it’s painful, this is usually just gas bubbles in joints and nothing to worry about.
Progression:
Start with 10-15 slow cycles, focusing on smooth movement. As this becomes easier, emphasize moving through larger ranges in each position.
You can segment the movement—move the wave from your tailbone forward through your spine rather than moving everything at once. This advanced variation increases spinal articulation.
Why this matters:
Spinal mobility naturally decreases with age and static postures. Cat-cow maintains flexion-extension range throughout the entire spine, preventing the stiffness that makes bending and moving uncomfortable.
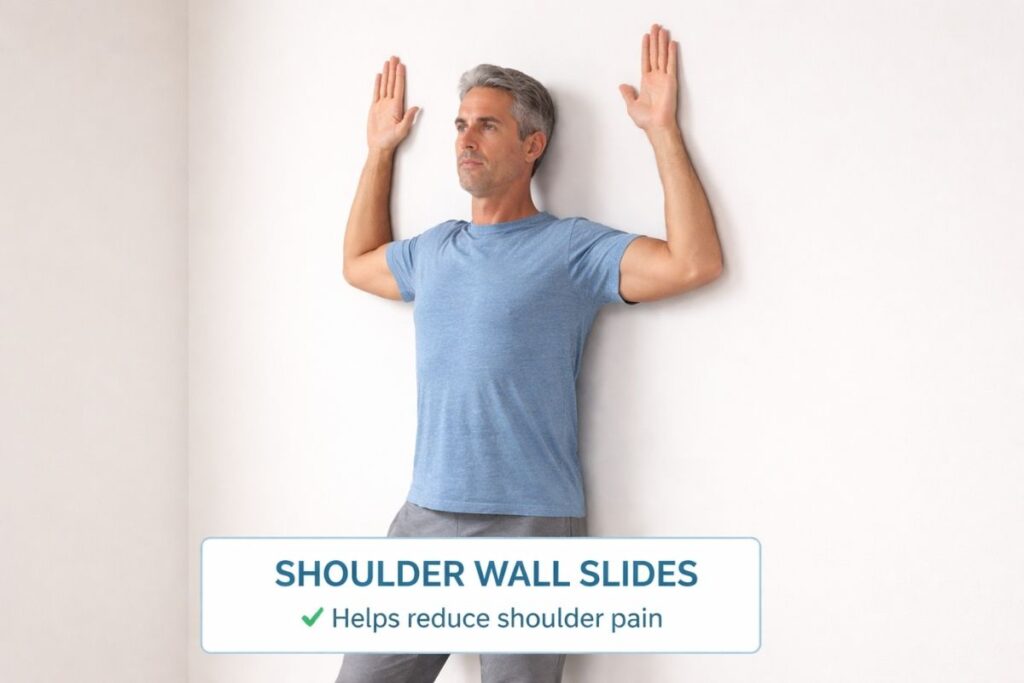
Shoulder mobility—particularly overhead reaching—declines dramatically if you don’t maintain it. Most daily activities don’t require full overhead range, so your body stops maintaining it.
How to perform:
Stand with your back against a wall, feet about 6 inches from the wall. Press your lower back, upper back, and head against the wall.
Bend your elbows to 90 degrees, raising your arms so your upper arms are roughly parallel to the floor. Press the backs of your hands, forearms, and elbows against the wall.
Maintaining all these contact points, slowly slide your arms up the wall as high as you can while keeping everything touching the wall. Then slide back down.
What you’ll feel:
This is challenging for most people. Maintaining contact points while raising arms requires significant shoulder mobility and scapular control.
You’ll likely feel stretch across your chest and possibly in your shoulders. Many people can’t keep everything touching the wall through the full range initially—that’s normal.
Progression:
Start by just achieving the starting position and holding it. If you can’t get your hands and elbows against the wall with arms at 90 degrees, work on that first.
As you progress, focus on sliding higher while maintaining contact. Eventually, you should be able to reach full overhead range with everything still touching the wall.
Ten slow slides, 2-3 sets, daily or every other day.
Why this matters:
Overhead shoulder mobility is essential for activities from putting away dishes to pulling on a shirt. Limited range forces compensatory patterns that stress the neck and can contribute to shoulder impingement.
Hip flexors shorten from sitting, which tilts your pelvis forward, increases lower back curve, and alters how your hips function during walking and other movements.
How to perform:
Kneel on one knee (pad the knee if needed), with your other foot forward in a lunge position. Your front knee should be roughly over your front ankle.
Keep your torso upright—don’t lean forward. Gently push your hips forward until you feel stretch in the front of your back hip. You might also feel this in the front of your thigh.
Hold this position for 45-60 seconds per side. Breathe deeply—tension often releases with breathing.
Enhanced version:
From the basic position, raise the arm on the same side as your back leg overhead and lean slightly to the opposite side. This adds a side stretch component and often intensifies the hip flexor stretch.
What you’ll feel:
Stretch in the front of your hip on the kneeling leg side. If you don’t feel much, push your hips forward more aggressively or squeeze your glute on the kneeling leg side.
Some people feel this more in the thigh (quadriceps). That’s fine—your rectus femoris (quad muscle) also acts as a hip flexor.
Progression:
Hold stretches longer as tolerance increases—up to 90 seconds per side. You can also add gentle pulsing at end range rather than static holds.
Perform this stretch daily, especially before bed if you sit extensively during the day. Countering the shortening effects of sitting prevents accumulated tightness.
Why this matters:
Tight hip flexors are one of the most common mobility restrictions and contribute to lower back pain, hip pain, and altered movement patterns during walking and squatting.
Wrist mobility matters more than people realize, especially with extensive keyboard and phone use that locks wrists into limited positions.
Wrist circles:
Extend arms forward, make fists, and rotate wrists in large circles. Ten circles in each direction. This general mobility work prepares for specific stretching.
Wrist flexor stretch:
Extend one arm forward, palm up. With your other hand, gently pull your fingers back toward your body. You should feel stretch in the underside of your forearm (flexors).
Hold 30 seconds per side.
Wrist extensor stretch:
Extend one arm forward, palm down. With your other hand, gently press your fingers toward the floor. You should feel stretch in the top of your forearm (extensors).
Hold 30 seconds per side.
What you’ll feel:
Wrist circles might feel tight or restricted in certain directions. The stretches target muscles that commonly tighten from keyboard work and gripping activities.
Flexor stretches (palm up, pulling fingers back) are often more intense for people who type extensively. Extensor stretches help balance the muscles.
Progression:
Gradually increase stretch intensity by pulling fingers back slightly more as tolerance improves. Never force it—wrist tissues are delicate.
Perform these stretches multiple times throughout the day if you do extensive computer or phone work. Prevention is easier than fixing chronic tightness.
Why this matters:
Wrist mobility prevents tendonitis and carpal tunnel symptoms. Regular stretching maintains flexibility and prevents the repetitive strain injuries common with modern technology use.
Neck mobility exercises prevent the forward head posture and stiffness that plague people who work at computers or look at phones extensively.
Gentle neck rolls:
Sitting or standing with relaxed shoulders, slowly lower your chin toward your chest. Roll your head to one side, bringing your ear toward your shoulder. Continue rolling your head back (gently—don't force), then to the other side, and back to chin-to-chest.
Five slow circles in each direction. The entire circle should take 15-20 seconds—move slowly and smoothly.
Side neck stretches:
Sit upright, reach one arm over your head, and gently pull your head toward the same side shoulder. You should feel stretch along the opposite side of your neck.
Hold 30 seconds per side. Breathe deeply—neck tension often releases with conscious breathing.
What you’ll feel:
Neck rolls often reveal tight spots or restricted directions. Many people have significantly more restriction rotating to one side than the other.
Side stretches target the muscles that often tighten from holding your head in forward positions during computer work.
Progression:
Focus on smooth, controlled movement rather than forcing larger ranges. As muscles relax and mobility improves, range naturally increases.
If any position creates sharp pain or dizziness, skip that movement and work with other ranges. Neck tissues are delicate—never force.
Why this matters:
Neck mobility prevents headaches, shoulder tension, and the progressive forward head posture that stresses the entire spine. Regular mobility work maintains the range needed for comfortable head movement.
This targets external hip rotators and glutes—muscles that commonly tighten and limit hip mobility, particularly in people who sit extensively.
How to perform:
Lie on your back, knees bent, feet flat. Cross one ankle over the opposite knee, creating a figure-four shape with your legs.
Reach through the triangle created by your legs and grasp behind the thigh of your bottom leg. Gently pull this leg toward your chest until you feel stretch in the hip of your crossed leg.
Hold 45-60 seconds per side. Breathe deeply into the stretch.
Standing variation:
If getting on the floor is challenging, you can perform this standing. Cross one ankle over the opposite knee while standing, then bend the standing knee and hinge at your hips as if sitting back into a chair. Use a wall or chair for balance if needed.
What you’ll feel:
Stretch in the outer hip and gluteal area of your crossed leg. Some people feel this intensely; others feel relatively little. Both are normal—you’re working at your current range.
You might also feel stretch in your lower back or hamstring of the bottom leg, especially if you pull aggressively. Focus the stretch in the hip by adjusting pulling force.
Progression:
As the stretch becomes easier, pull the bottom leg closer to your chest to increase intensity. You can also press the knee of your crossed leg away from your body with your elbow for a deeper stretch.
Why this matters:
External hip rotator tightness limits hip mobility and contributes to lower back compensation patterns. This stretch directly addresses one of the most common mobility restrictions.
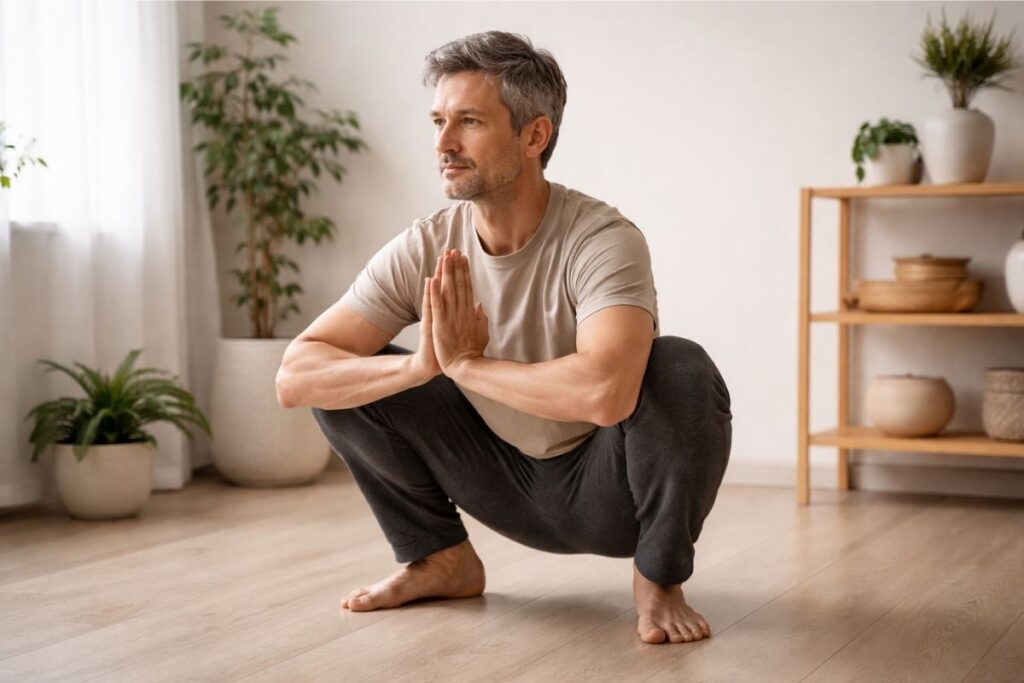
A deep squat position requires ankle, knee, hip, and spinal mobility. Holding this position regularly maintains the integrated mobility needed for countless daily activities.
Maintaining squat mobility is a key predictor of independence as we age, a theme we explore in depth in Active Aging After 50.
How to perform:
Stand with feet roughly shoulder-width apart, toes pointed slightly outward. Squat down as deeply as you comfortably can, ideally until your hips drop below your knees.
Keep your heels on the ground—if they lift, your ankle mobility is limited. Your knees should track over your toes, not caving inward.
Hold this bottom position for 30-60 seconds. You can hold onto something for balance initially—a doorframe, table, or squat rack.
What you’ll feel:
Stretch in your ankles, hips, and possibly lower back depending on your current mobility. Some people can achieve a deep squat relatively easily; others struggle to squat even partway down.
Your ability to hold this position reveals mobility limitations. Heels lifting indicates ankle restriction. Knees caving inward suggests hip mobility or strength issues. Inability to descend deeply suggests hip or ankle limitations.
Progression:
Start by holding whatever depth you can achieve comfortably. As mobility improves, gradually work toward deeper positions.
Eventually, aim for a full deep squat hold where you could sit comfortably in this position for minutes. Many cultures maintain this mobility into old age by squatting regularly during daily activities.
Why this matters:
Squat mobility integrates ankle, knee, hip, and spinal movement. Maintaining this capacity prevents the progressive inability to get down to the floor and back up—a key marker of functional independence.
Deep squatting ability is closely associated with functional independence and lower injury risk in older adults (source).
These ten mobility exercises work best when integrated into a consistent daily practice, not done sporadically when you remember.
Morning mobility sequence (10-15 minutes):
Perform a shortened version of all exercises to prepare your body for the day. Your joints are stiff from hours of sleep immobility—gentle movement before launching into activity prevents pain and injury.
This sequence moves every major joint and takes minimal time.
Evening mobility session (15-20 minutes):
Longer holds and more comprehensive work when your body is warm from daily activity.
Targeted work for problem areas:
If specific joints are particularly stiff, add extra focused work. Tight hips might need 5-10 minutes of hip-specific mobility daily. Stiff shoulders might need dedicated shoulder work.
Consistency matters more than perfection:
Missing a day occasionally isn’t catastrophic. Missing a week regularly means you won’t see improvements. Aim for at least 5-6 days weekly of some mobility work, even if shortened.
Forcing aggressive stretches: Pain isn’t gain with mobility work. Gentle, consistent stretching produces better results than aggressive forcing that often creates protective muscle tension.
Inconsistent practice: Stretching once weekly produces minimal benefit. Daily brief sessions beat weekly long sessions.
Static stretching before strength training or sports: This temporarily reduces force production and can increase injury risk. Save static stretching for dedicated mobility sessions or after activity. Dynamic movement is better before athletic activity.
Studies indicate that prolonged static stretching before activity may temporarily reduce strength and power output, making dynamic movement more appropriate for warm-ups (source).
Neglecting strength: Mobility without strength to control new ranges creates instability. Balance mobility work with appropriate strength training.
Expecting immediate results: Mobility improvements take weeks of consistent practice. Initial changes might feel subtle. Trust the process and maintain consistency.
If joint pain or stiffness persists despite regular mobility work, it may be related to an underlying condition covered in our Complete Guide to Joint Conditions.
Document baseline mobility:
Film yourself performing key movements—squat depth, shoulder overhead reach, hip rotation. Written descriptions work too—”Can’t squat below parallel with heels down” or “Can’t reach overhead with elbows straight.”
Baseline documentation lets you objectively assess progress, which often happens gradually enough that you don’t notice without comparison.
Monthly reassessment:
Repeat the same tests monthly. Can you squat deeper? Reach higher overhead? Rotate further? These objective markers confirm whether your mobility exercises are working.
Subjective improvements matter too:
Notice daily activities that become easier—putting on shoes, reaching overhead to high shelves, getting up from the floor, turning to look behind you while driving. These functional improvements are the real goal.
Adjust focus based on results:
If certain areas improve while others remain stuck, shift emphasis toward stubborn areas. Some mobility restrictions respond quickly; others need months of dedicated work.
Mobility exercises aren’t flashy or exciting. They don’t produce dramatic immediate results. But consistent practice maintains the capacity to move freely and comfortably through daily life—something that becomes increasingly precious as you age.
The people who maintain excellent mobility into their 70s and 80s aren’t lucky. They’ve maintained regular movement through full ranges for decades. Start now, stay consistent, and you’ll maintain the mobility that keeps life comfortable and functional.
Note: This is educational information about mobility exercises, not medical advice. If you have significant joint injuries, conditions, or movement restrictions, consult with a physical therapist for individualized assessment and programming.